'Grow with Me' Styling for the Kid's Bedroom

With my own kids suddenly college-age, I’m hyper-aware of how quickly they grow up. That’s why when I’m photographing a kids’ room, I encourage “grow with me” styling. Ever heard of “grow with me” pants? The hem can come down each time the child grows. Well, children’s bedrooms should be styled like this as well. It’s good photography because it tells an interesting story, that this space is sophisticated enough to evolve with the child, and it’s good design because it demonstrates that the designer has their clients’ best interests in mind. Kids do grow up quickly, and redoing an entire room every few years isn’t much fun. What follows are my tips for ‘grow with me’ styling in the kid’s bedroom (excluding the nursery), for photo shoots and life. Now, let’s put on our big boy pants, and begin!

Tip #1 No Toy Spillage

It’s really tempting to spill a lot of colorful toys on the floor in the foreground of the shot. It’s usually not what you are striving for image-wise when the items are the plastic, primary color kind. A few well placed quality wood toys are fine, but I prefer toys that don’t define a certain age. Blocks and other building toys can look pretty sophisticated, read well in the image, and don’t scream “preschool.” They are often found in natural woods that look good with the other tones in the space.

designer:Sasha Marie Interiors/photographer: Lisa Russman

designer: Sasha Marie Interiors/photographer: Lisa Russman

Tip #2 For Scale: Foreground Item

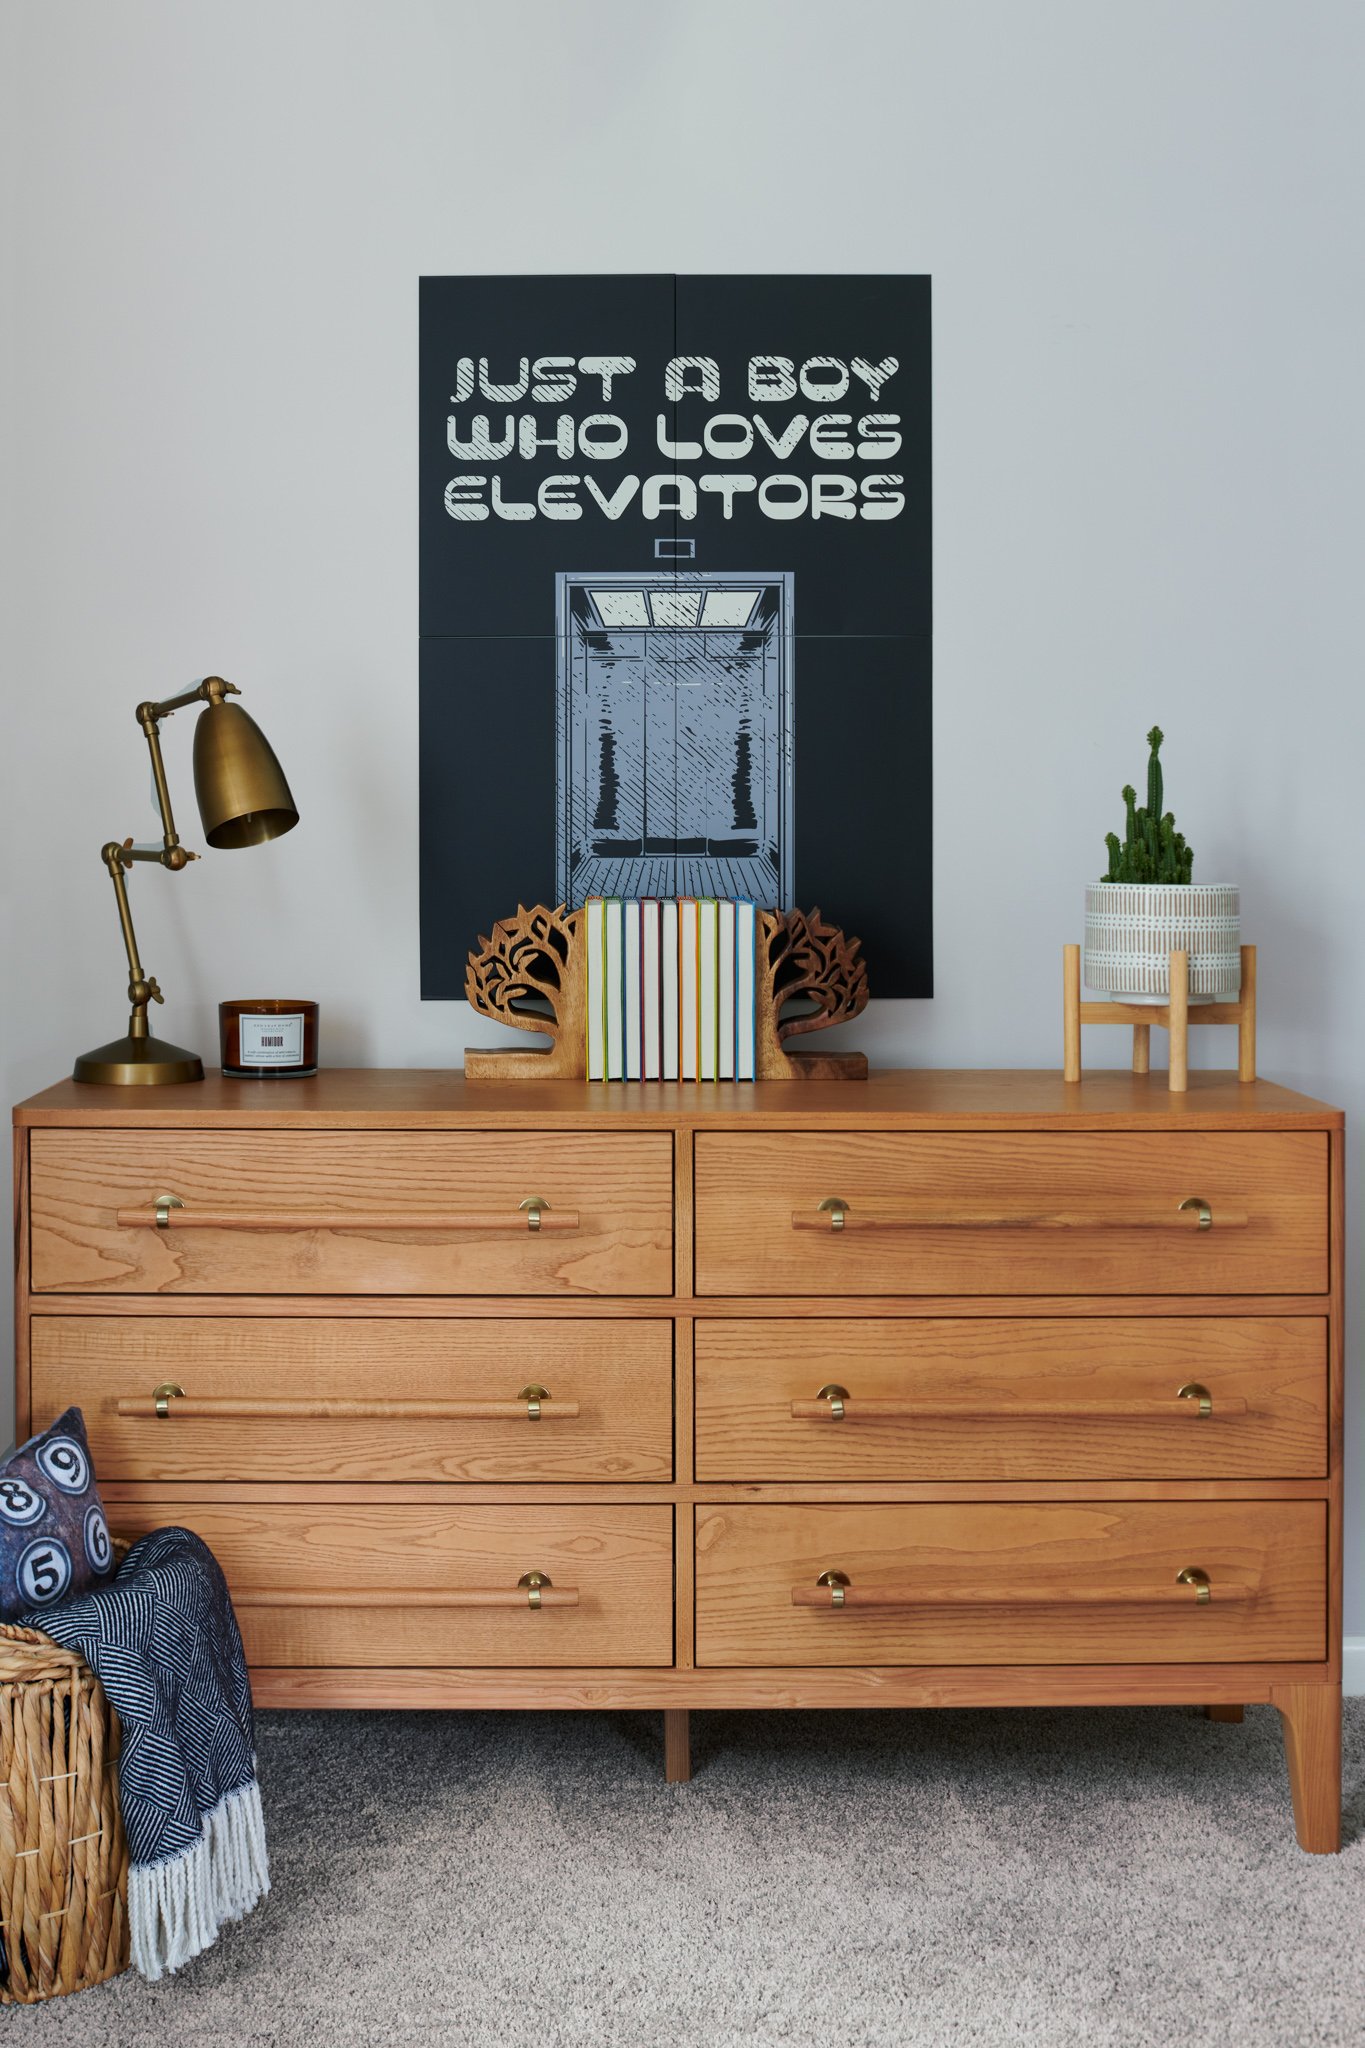
It’s good to anchor a dresser or bed with an item in the foreground, to help with scale. The bigger the item gets, however, the wonkier it can look (too large and too distorted). A basket or stool is often the best choice and the right scale, bringing in colors and textures that relate to other things in the image. In this picture you can see that the texture of the basket looks great with the natural materials on the dresser and the tones look great together. Inside the basket are pillows and a throw that relate to the poster in color, style, and rhythm. Well done, Sasha Marie Interiors!

Tip #3 Think Sequencing or Image Set

Images in a set need to all relate to each other, so when they are viewed together they make sense. The pillow and throw placed in this dresser shot relate to the bedding and props in the overall room shot. Don’t add something to one shot that won’t make sense in the subsequent shots in that same space.

Tip #4 Tell a Story

These two images tell a story. This child loves elevators and all things Pixar. The poster is clever and timeless, the lamp is a nod to Pixar and can be used at any age. The light up connecting hexagons don’t define the age of the child. The colors are playful but the rug and curtains are not age-specific. The pops of orange are fun but also can be found in any room so there is a level of sophistication there.

Tip #5 Make it Pop

You need a pop, whether it’s a pop of color or a surprise. Something to pull you in. Here it is obviously the orange bean bag chair. If that were grey this would be a different image altogether.

Tip #6 It’s Good to be Odd

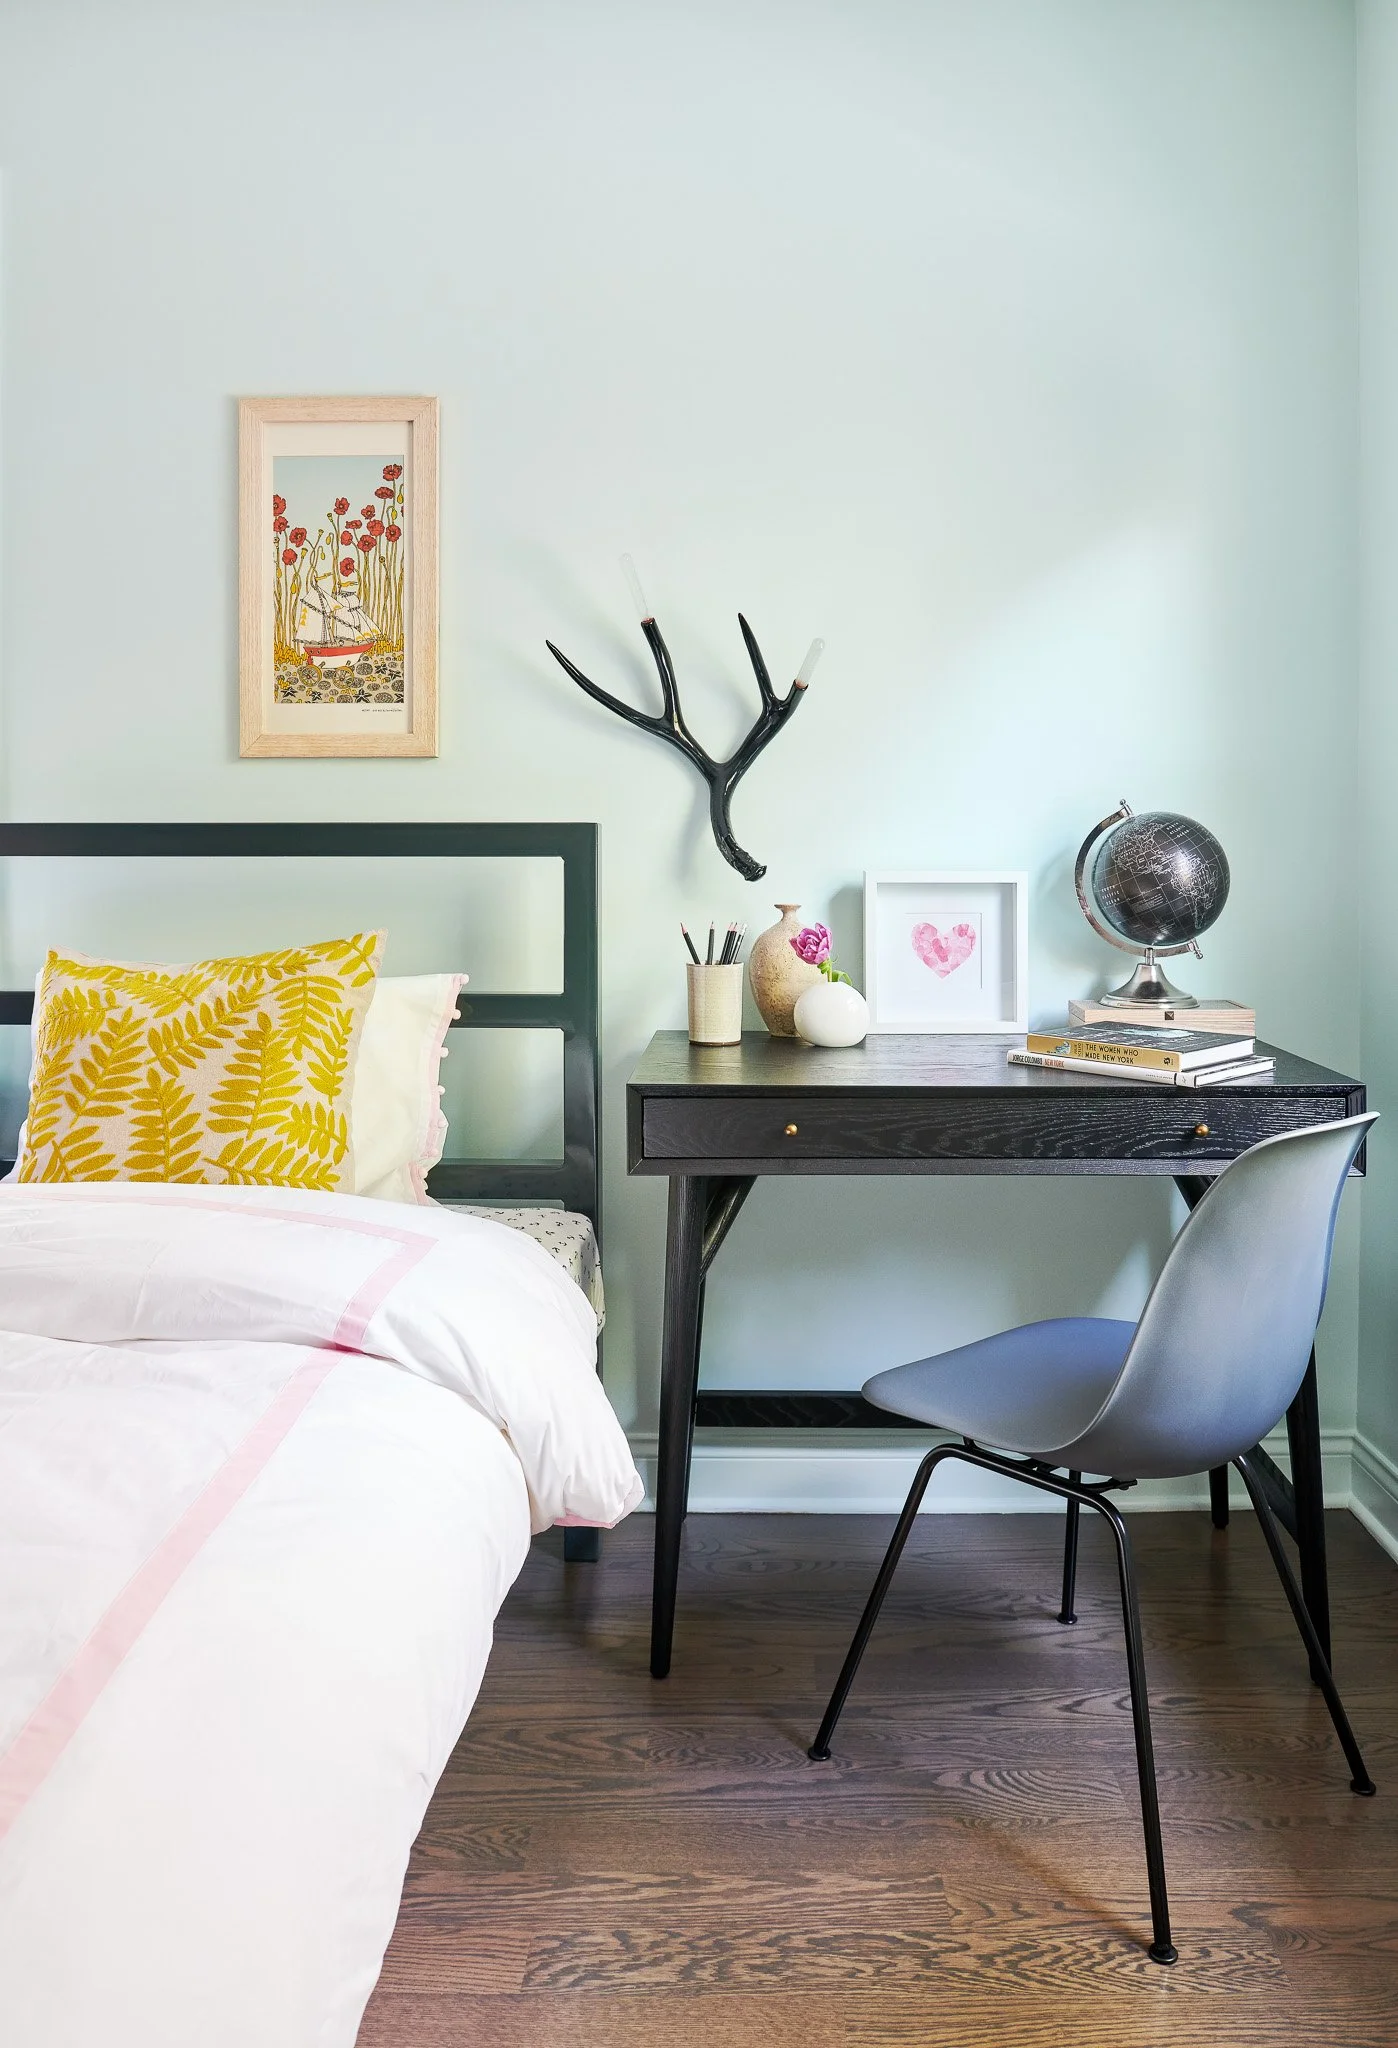
Like in life, it’s pretty cool to be a little odd. On desks and dressers, the floor or the bed - all items seen really - should be in threes or fives or sometimes sevens. It just looks better. Let’s say it’s three things. Here are the three categories for picture-perfect surface styling in a kid’s bedroom:

designer: Tina Ramchandani/ stylist: Frances Bailey/photographer: Lisa Russman
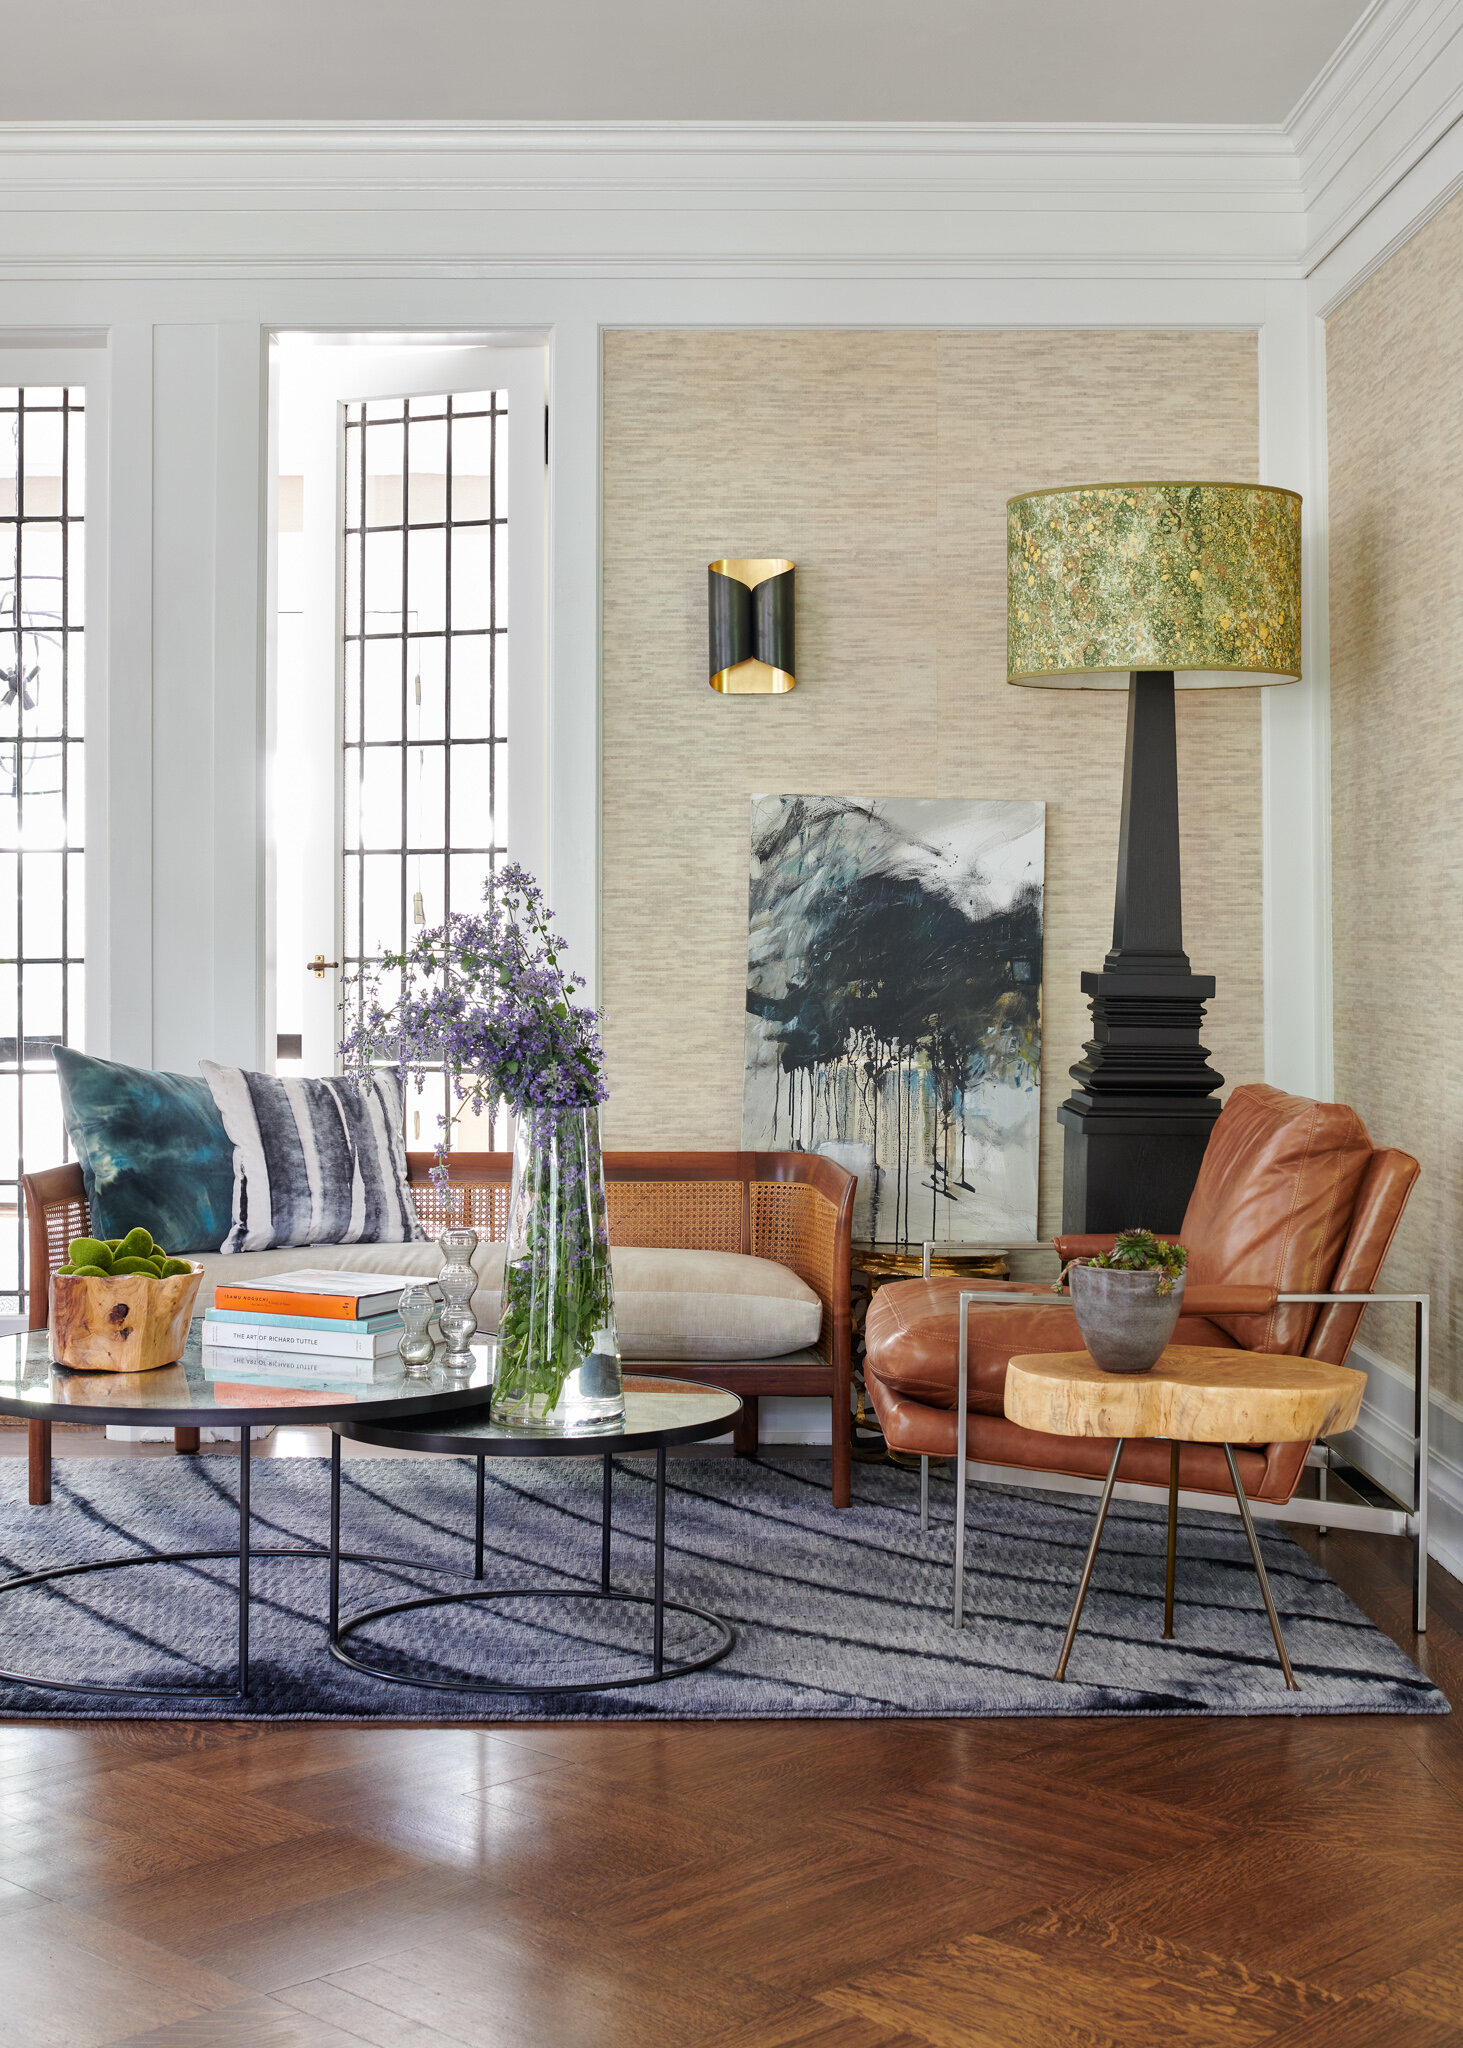
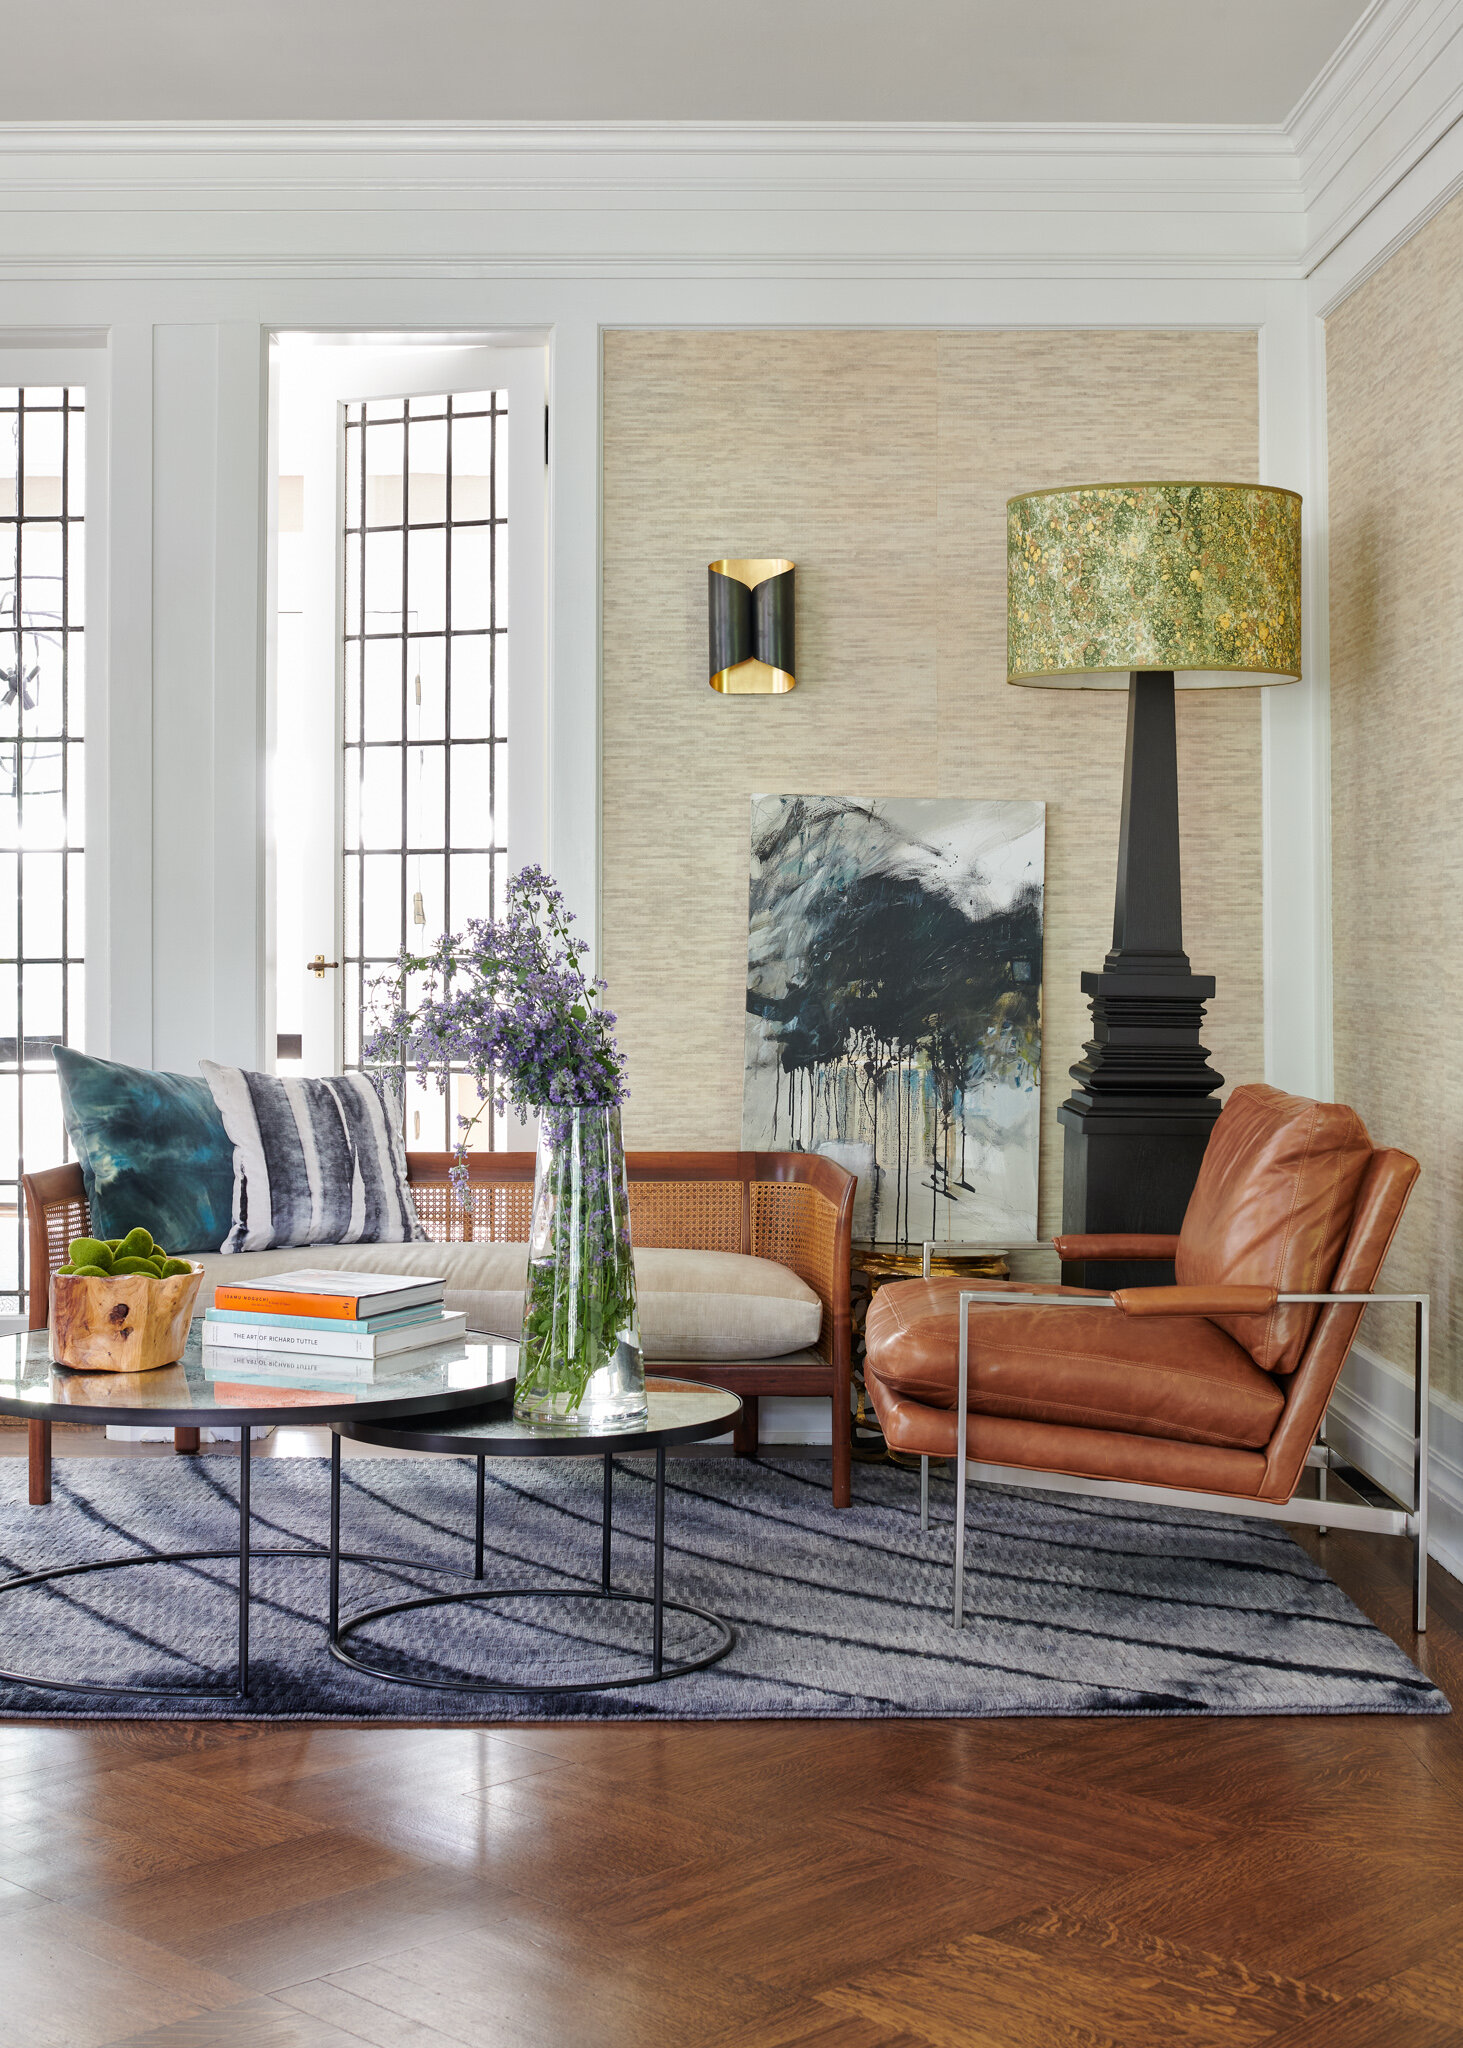
  • Make it living

Be it a plant, flowers, or even a fish, put something living in there. It immediately makes the image look real, not staged. It’s appealing, it’s inviting, and it’s fresh. Always.

  • Add some character

What’s the item that makes this about someone in particular? Here this kid loves geography and reading. In the dresser image above, it’s the poster. Add something really unique that tells (or makes up) a story about the person who lives there.
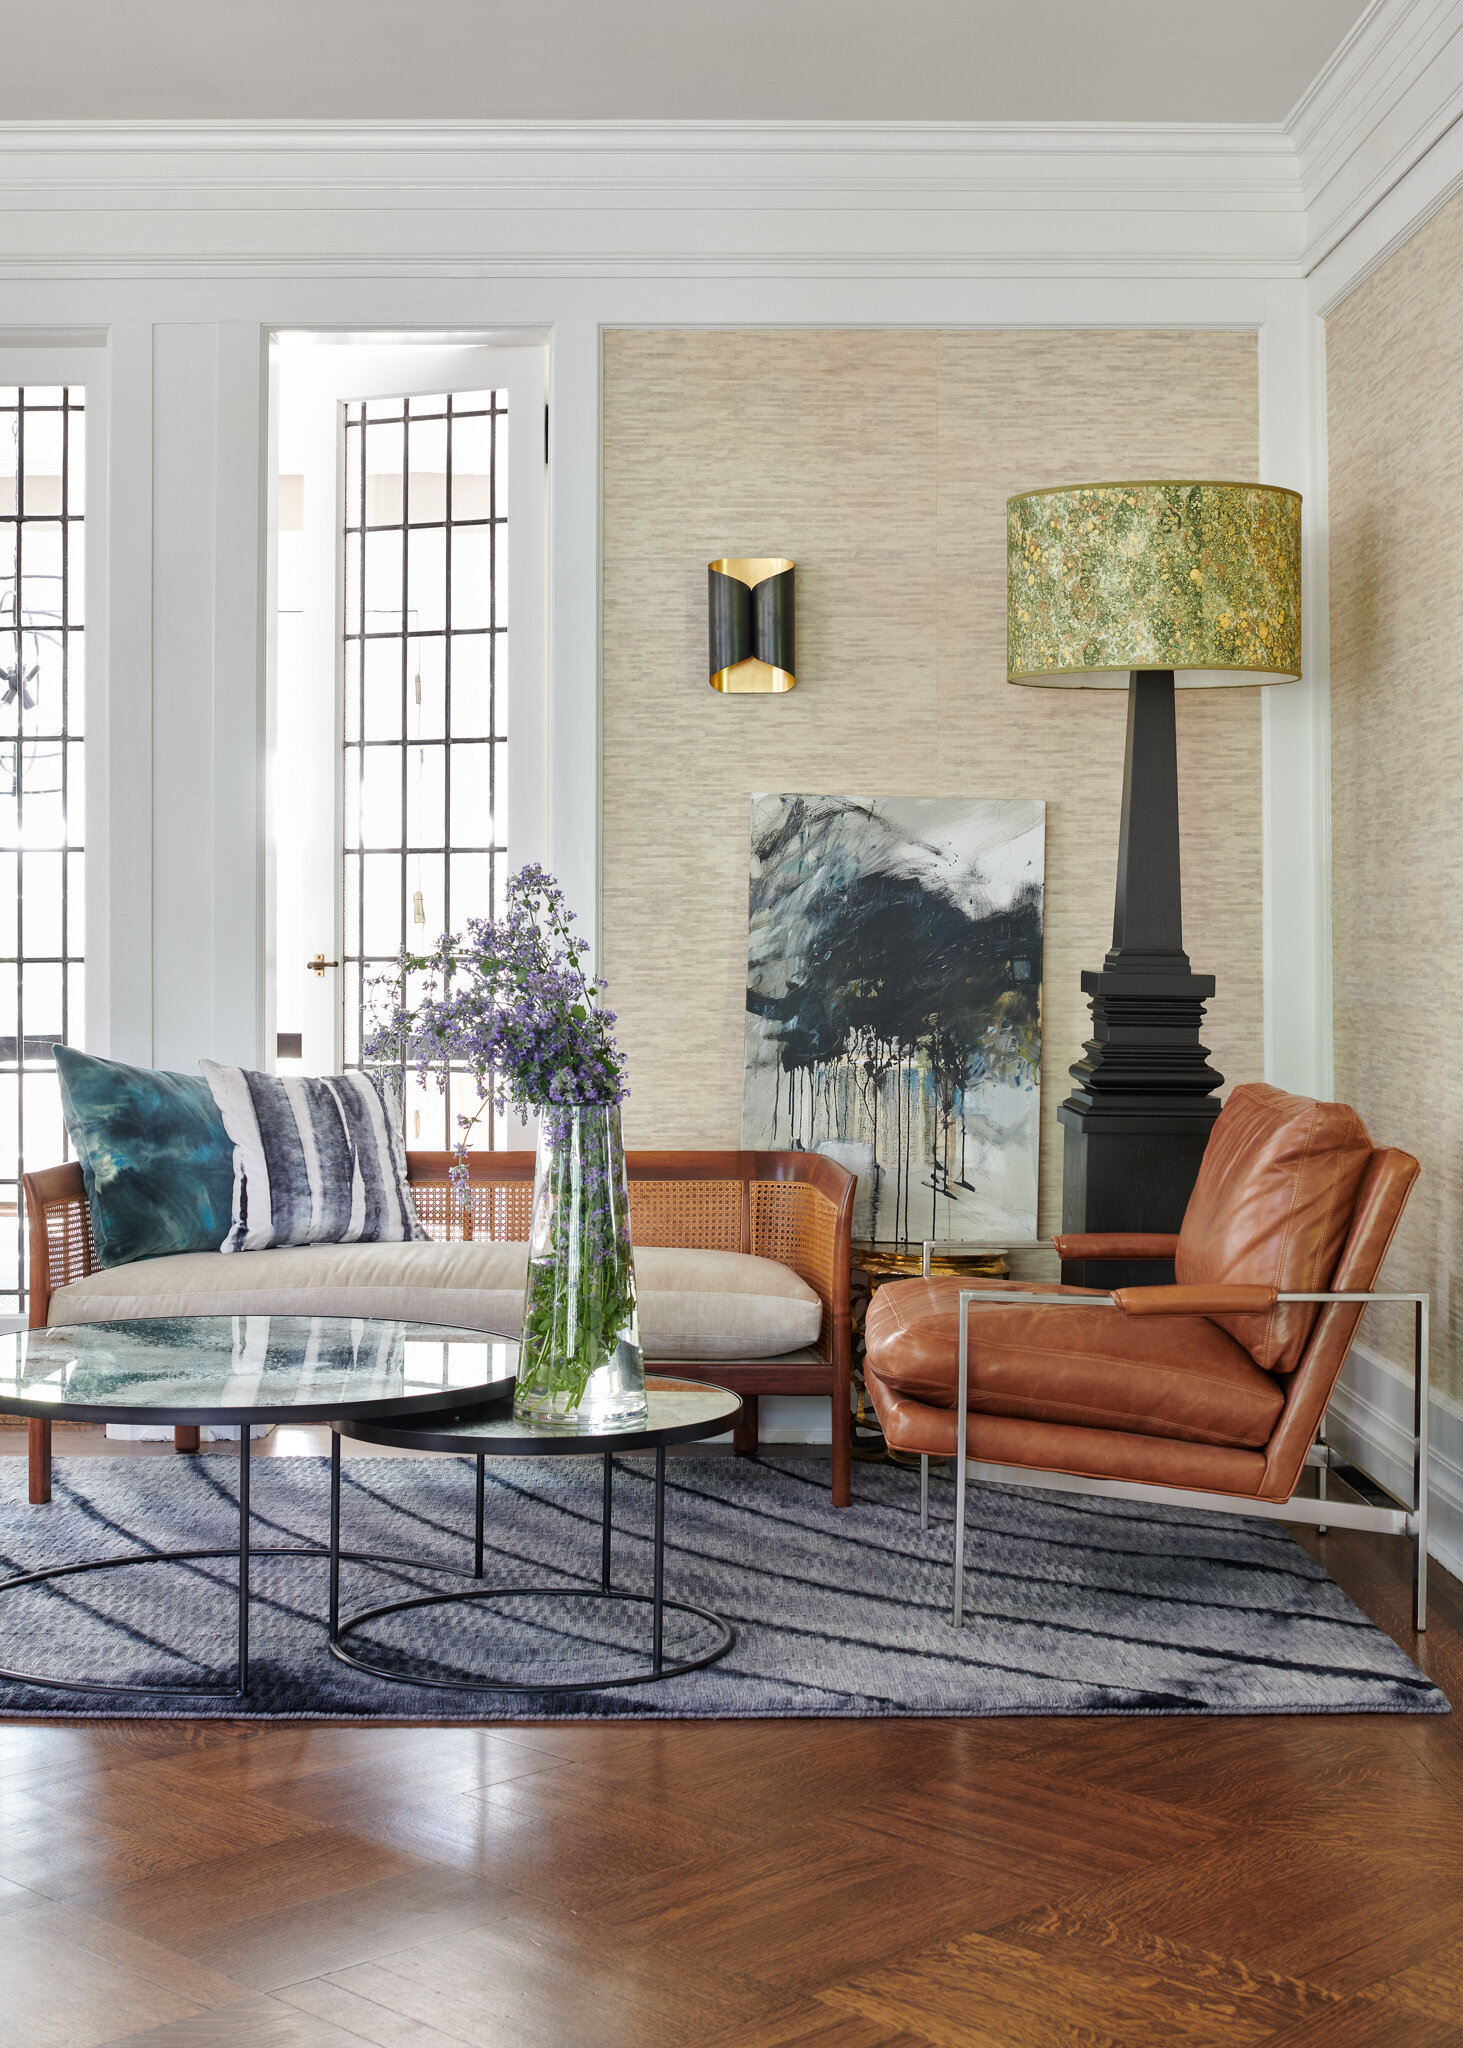
  • Lend sophistication

Weave in that sophisticated item that says someday a teenager or a young adult could live here. Here you see that the sconce and the delicate organic vases lend that feel. Well done Tina and Frances!

Tip #7 Instead of Homegoods or Target…

Oftentimes, when my clients don’t bring a stylist on board, they might hit a Homegoods or Target, load up on items we’ve discussed for the shoot, keep the tags on and hope to return them later. Hmmm….. I’m not going to complain about that, but here’s why it’s often a bad look. Many of these items just look like they are from a big box store. There are a few shelfie items I think I’ve shot fifty times already from Homegoods. And the tags, well they appear in the images and have to be edited out. Here is a BETTER idea, one I encourage to all of my clients: build relationships with local boutiques and artists and BORROW items. They can be tagged in the shots and increase their own visibility online (who doesn’t want their products photographed in actual rooms). It builds community and it supports your local businesses. Boom!

I’d love to hear your thoughts on this post, so please add a comment or send me a message!

Finding Images You Can Use With Confidence

Most of the time, I take a set of images for a client and provide a usage license for social media, websites, magazines, ads and marketing pieces - you name it, I’m delighted to give the license. I want my clients to use and enjoy the images. In this scenario, as the photographer, I have the copyright, and I give permission and additional licenses to anyone who wants to use an image. This includes my clients’ vendors, or other people involved in the project. It also means that when they share the image on Instagram - including stories - they not only include the photo credit but they make sure anyone adding their post to stories does the same. It’s a lot, and I will cover this in a separate blog post.

So, what happens if you really want to put an image on your website, blog or post and you know you don’t have a license for it? It seems like few people make an effort to find out the attribution or copyright information of an image, so why should you bother? I sure wish I had a nickel for every time I see “photo by other” on an Instagram post. Here’s the truth: just because an image is out there does not mean it is out there legally, and if you don’t see an attribution right where you spotted it, it doesn’t mean you can just use it however you like. My copyrighted work is all over the place without attribution, but I didn’t put it there. In addition, images can be on Pinterest, Instagram, websites and the like and only have partial rights information available. Time to learn how to do some detective work on the matter so you know you are using images without restrictions.

Using Google Advanced Search

Say you are looking to post an image of a bamboo stool. You enter “bamboo stool” in the google search bar and many wonderful images, including images from blog posts, pop up. Click on the gear in the top right corner and go to “advanced search.” At the bottom is a drop-down menu called usage rights, which lets you specify your criteria. In this case, our options are “all,” which is what a regular google search finds, “Creative Commons Licenses” and “Commercial and Other Licenses.” When I select either of these two and hit the blue advanced search bar, the pickings are slim. Very slim. I do notice under Creative Commons Licenses there is a terrific stool I could share, titled “Mudha Stool, Rajasthan” on Flickr. Next, I click on the license details that go with the image so I can view the license information. It takes me right to Creative Commons.

Creative Commons

Creative Commons is a non-profit that provides a place for people and organizations to “grant copyright permissions for creative and academic works, ensure proper attribution, and allow others to copy, distribute and make use of those works.” The available license for this stool, “attribution-ShareAlike 2.0 Generic (CC BY-SA 2.0)” lets me “Share — copy and redistribute the material in any medium or format” and “Adapt —remix, transform and build upon the material for any purpose, even commercially.” Under these terms, I must give the the appropriate credit and provide a link to the license. In addition, if I rework the image, my contributions to the image have to be distributed under the same terms as the original. Great! So now back at the image in google search, I need to go straight to its source on Flickr to get the photographer’s information and the image itself.

On Flickr, I learn that the image is by Neil Cummings, and there is additional information here as well about where the image was taken and when (you never know, that information could be useful in a blog post!). The final step is to properly credit Mr. Cummings. At the bottom of the page where posted (or in a similar location), put the name of the photographer, the rights as indicated (this is right there on the source site) and link it back to the site. A second way to do it (and this is preferred), is to put the name of the photographer with a link back to his area t the source of the image (Flickr), the name of the image with a link back to the source, and a link to the Creative Commons license. Want to see the stool, attribution and rights info? Here it is!

Mudha stool, Rajasthan

Neil Cummings, some rights reserved or

Neil Cummings, Mudha Stool, Rajasthan, CC BY-SA 2.0

How to Plan Ahead For Editorial Coverage

This is part 2 of my Planning Ahead series that take on topics for creatives to consider in the time of COVID-19, and to provide insights on how to be prepared once we can safely step back into collaborative work.

I’ve been an interiors and architectural photographer for 10 years now, but my first career in arts communications is a background I lean on all the time help my clients get the most out of the visual set I create. All of that experience spearheading strategic communications campaigns for major museums and cultural institutions is useful today. I worked closely with curators, architects and museum leadership to shape newsworthy story ideas, wrote releases and pitches and built relationships with key journalists, managed major press announcements, interviews and film crews, and built the public image and messaging for institutions all over the world. This experience plays into how I think about my work as a photographer every day, and what’s going to best serve you. I can’t help it. I am always thinking of all the ways I can help my clients finesse their own public relations goals, and benefit from the visual record I create for them.  

So, how do you get ready now for the editorial coverage you deserve? First of all, getting ready now means whenever you can, but preferably not when you’ve done your last install and have hired your photographer. Ideally, start this process at the beginning of your project, and continue with it all along the way. Now is a good time to get started, if your work has slowed or you are taking stock in your business plan, due to the coronavirus pandemic. Either way, with a little advanced prep at the start of each project, you’ll be ready to get in front of the right editor and land the editorial placement that best promotes your work and your business.

Pay attention: what kind of story is it? All editorial coverage has an angle, or a “hook.” When pitching a project to an editor or writer, you need one. Did you help a family make their new suburban house a home? Did the couple you designed for have very different sensibilities, and your solution is a happy medium they both love? Did you use unique materials, involve interesting partners, or honor off-beat client requests? Is it a DIY story? A “House Tour?” A “Before and After”? (And if so, take some “before” shots of the angles you think will be showstoppers later).

Knowing this hook can shape the kinds of pictures we take together. For instance, if this is a truly “family friendly” home and that’s the angle, we’re going to photograph the stain-resistant chairs, the kids’ hangout room, and so forth. Sometimes, we figure this out together during our collaborative photo shoot. Other times, a story emerges once the photographic set is finished, and it seems obvious where the best “editorial home” is.

I will often provide my clients with a list of questions to answer, so this pitch can be further developed. With these responses, I can write the pitch and get it in front of the right editor.

Be honest: what’s the right editorial fit? A feature in the pages of House Beautiful sounds amazing, but if you are just starting out, that may be unrealistic. Where are you at, right now, in your field? Where do you want to be, and could this image set be the right vehicle to get you there? Visualize the kind of coverage that would actually benefit your business the most today, and be realistic.

Soul search: Who is your audience? This one goes hand-in-hand with knowing what the right editorial fit is. If you understand who your audience is, then you will know where your story will resonate. Whether your audience is a family decorating their home for the first time, starting a kitchen renovation, or redoing an upscale apartment, take a moment to define your audience. It will serve you well.

You may really want a project published so you can get street credibility on social media, so a web-based publication with a “House Tour” that showcases a large gallery of images would work well. Maybe it’s time to score designer panels, blog interviews, and awards, in addition to more prestigious projects. If this is the case, you may want a print or web-based outlet that highlights you, your niche, and your process in the context of a special project. Or, if you want to get in front of potential clients in your region, then perhaps a glossy regional magazine makes the most sense. A good seasonal hook (summer outdoor seating areas, festive holiday decorations, etc.), including a shot of you on site, with or without your client, works well here. Do you want to establish yourself in a particular niche, maybe one you want to be known for, like kitchen design? Then have your best kitchen photographed, and include unique details that set you apart.

It could also be that it’s not the right project for editorial, and the photographs would best serve your portfolio or social media campaign. It can be hard to sort through it all, so I consult with my clients on these goals, helping them figure out the kind of editorial coverage that works for their business, and I plan a visual package to get them there.

Be you: What is your unique style? I like to call this the “let your freak flag fly” tip (that’s a song from Shrek). When I talk to my clients on the phone to get to know them, their project and their business, I always ask them what sets them apart from other designers. What makes them special and makes them tick? I get great answers, whether it’s attention to bold colors, an affinity for texture, or a love of integrating vintage finds. And you know what, that totally leads me in the visual narrative I’m creating on the photo shoot. This self-awareness of what sets you apart from the pack defines you and your brand. Even if it might morph a bit -- and we all do grow and change -- you have to own your brand now and be able to articulate that to a writer.

Be an expert: Why not you? Everyone is great at something and you need to position yourself as an expert, even if you feel uncomfortable about it. Your industry is as much about you as it is about your design skill, because your personality and people skills are hugely important to your clients. We all have to share more about our lives, the creativity we cultivate and the people and things that inspire it. Editors will know more about who you are and it could correlate to more quotes from you and more pictures of you, in their pages. I’m going to have posts later on that go deeper into this idea.

Build relationships. If you’ve been included in any article or featured in a story, send the writer and the editor a note of thanks. Check in with them from time to time to let them know what you are doing. You never know when they might need a quote from a designer, and building relationships here is key to long-term success. In addition, build on partnerships so you can include them in projects. Sometimes the involvement of a high-profile partner can be just the angle an editor is looking for.

Keep lists. Start a list of the key vendors and partners you used in each room. This will be easier later, not only when working with an editor but for tags on social media.

Keep a “library” of saved articles.  Start a file, bookmarked on your computer and in a folder on your desk of all the articles that could easily be about you or your project today. Also bookmark those stories that you hope for one day. Keep an eye on what your competition is getting ink about, and see where their coverage lands. Notice the kinds of stories that are out there, and think about where you and your project fits.  It’s also really good to be familiar with who does what, so you know their “beat” when you speak to them. Editors really like it when you know their publication and the various ways they cover design.

Create a file now on your project. Pull together your drawings, inspiration, before shots and in process shots that you take. Doing this is great for two reasons. First, I like to refer to pictures of the space you’ve designed so we can create a shoot plan. I create a shoot plan for all my clients so we have a guide to our day together – it is something that can be adjusted and amended on site, but it’s helpful going into a shoot to know which spaces we’ll photograph, potential number of shots in each space, and the highlights to capture. It also helps me create our styling plan – yes, I help in advance with styling, but that’s for another blog post. Second, having these images on hand makes it easy to find when the writer wants a schematic or before picture for their story. I send all of my clients a Dropbox link at the start of our work together, so they can easily drag and drop these images in -- so it’s all at our fingertips. 

Want to know more? Get in touch! I’d love to connect.

editorial blog post.jpg


A Safe Way Forward

This is Part 1 of my Planning Ahead series that take on topics for creatives to consider in the time of COVID-19, and to provide insights on how to be prepared once we can safely step back into collaborative work.

 A SAFE WAY FORWARD

There has been a great deal of helpful material written about how to get along as creatives during these uncertain times. Some of my interior designer clients have managed to pivot into virtual consultation mode and retained (or gained) clients, some of my architect clients have a few projects slowly moving forward, and others have ground to a halt. For now.

If you haven’t done so already, lean on the professional organizations you belong to, or join now. I’m a professional member of ASMP, the American Society of Media Photographers, and it has been a supportive community in this time of crisis. There are so many topical live webinars and town halls covering economic relief options and changing business issues during this period.

I watched an ASMP webinar this week that simulated a product shoot between a photographer, an art director, and the hypothetical client (in this scenario, that was the viewer) to show how to effectively use zoom to conduct a shoot. What became immediately clear is that since I am not a product photographer, working virtually with my client would not be so straightforward. I can’t receive a contact-free shipment containing products to my studio for a shoot – I’m usually in a residence or sometimes a commercial space, conducting hands-on styling with my clients in close proximity. Still, I wonder, are there any scenarios when I could conduct interiors shoots now, or soon, using safety protocols and technology? And perhaps more importantly, if that’s not realistic, should I have my own policies in place for safety and cleanliness on set, and work out a new way of collaborating, so I’m ready when we can cautiously go back to work? The answer is yes, and here are some takeaways for everyone to consider.

1.     Photographers need to get their zoom game on. We all know by now how to be on a zoom call, but photographers need to be totally ready for a virtual photoshoot and have all the wrinkles ironed out in advance. This means being ready to share their screen with both a client and a stylist, to show their captures in Capture One (or Lightroom) using live video. There are many details to work out in advance so the shoot is seamless for the client: the best way to share shots with the client and how many in process shots to share, the best audio set up so the client can hear the photographer when her/she moves away from the microphone, whether there is a need for a wifi hotspot or a different wireless tethering device so lo res jpgs can be sent to a client for review, and so on. For photographers, I’m going to be polishing this up from home in the coming weeks and will create a downloadable PDF that goes step by step through the process. I would suggest that anyone embarking on a virtual photoshoot do a trial demo first, in advance, so everyone is comfortable with the set-up. 

2.     Photographers should call the shots about who is on set. Whether in a studio or on location, the photographer needs to call the shots on who is allowed on set, who touches what, and how the client and stylist interact. Photographers conducting shoots right now are not hiring their usual crew, but typically have one assistant or digital tech to help. Each person is assigned to their piece of equipment, wearing masks, gloves and social distancing, and that doesn’t ever change throughout the shoot. For example, the photographer conducting the simulated ASMP shoot was near the product and was the only one touching it and the camera. His hypothetical assistant would be stationed at a distance, and the only one touching the computer. Another consideration, if the client wants to be on site, is to have her sit in another room, looking at the shots wirelessly transferred onto an iPad.

3.     Follow an established cleaning protocol. Create guidelines for the number of times per hour hands are washed and/or sterilized with hand sanitizer. Wipe all things down routinely and often.

4.     Situational awareness. Always have situational awareness of who is on set and where they are located. Everyone wears masks and socially distances. 

5.     Create your own coronavirus policy for your clients and post it on your website. This is for everyone to do. Interior designers can let clients know their policy for consults and installs. Architects can inform clients on ways to have virtual meetings and how they will conduct safe site visits. Contractors can explain where they can work and how they will conduct their work. Stylists can outline how they can make online purchases and have zoom selection meetings with clients, instead of having to go to stores. Photographers can outline their protocols for conducting safe shoots, cancellation policies, and so forth.

6.     Be prepared for budget, timing and reduced numbers of captures. I know that I will be including an assistant for my shoots whenever it is that we all go back to shooting interiors. The extra set of hands will help us all stay safe on set. The addition of an assistant will add to the budget, as will other potential costs associated with the new conditions. In addition, the process is bound to take longer, so we should be prepared that a shoot will likely produce fewer final captures. 

7.     Empathy, togetherness and patience. We are all going to need these things to support one another through this when technology crashes, props don’t arrive, or things take longer than expected. We’ll get through it!  It will just be nice to be working, and to be working together.

Collaborating in days gone by with Karin Eckerson Interiors

Collaborating in days gone by with Karin Eckerson Interiors